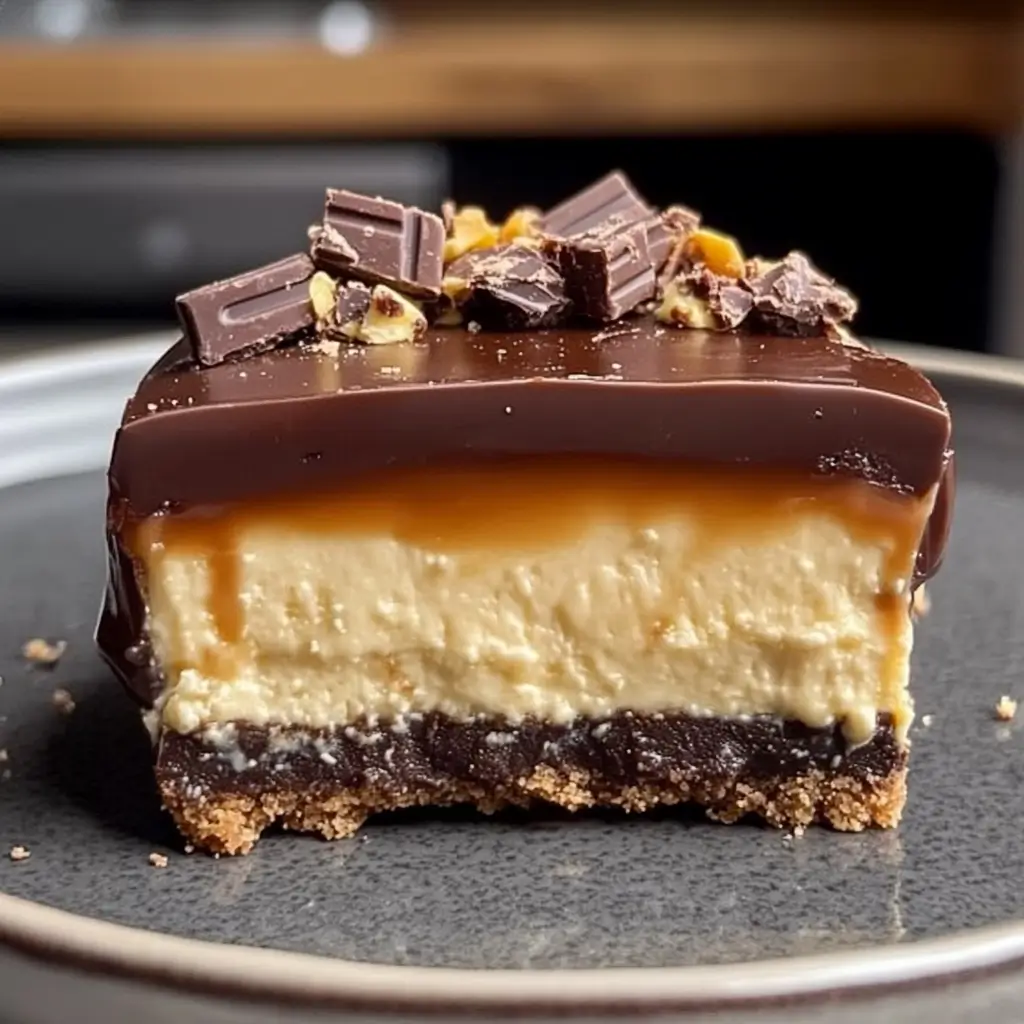
This no-bake Twix cheesecake brings together the best of creamy cheesecake, rich caramel, and smooth chocolate—all layered over a buttery graham cracker crust. It’s a decadent treat that looks impressive but is surprisingly easy to make! Perfect for any occasion, this cheesecake doesn’t require an oven, making it a quick and crowd-pleasing dessert.
Why You’ll Love This Recipe
- No-Bake Simplicity: No oven required, which means less hassle and a shorter preparation time.
- Twix-Inspired Layers: Rich caramel and chocolate layers mimic the flavors of a Twix bar.
- Creamy and Smooth Texture: Whipped cream folded into the filling adds a light, airy touch.
- Ideal for Sharing: This cheesecake is perfect for parties or special occasions.
Ingredients
- 2 cups graham cracker crumbs
- 1/2 cup melted butter
- 1 cup chocolate chips
- 1/2 cup heavy cream
- 2 cups cream cheese, softened
- 1/2 cup powdered sugar
- 1 teaspoon vanilla extract
- 1 cup caramel sauce
- 1 cup whipped cream (homemade or store-bought)
Step-by-Step Instructions
Make the Crust
- In a mixing bowl, combine the graham cracker crumbs and melted butter until fully mixed.
- Press the mixture firmly into the bottom of a springform pan to form an even crust layer.
- Place the crust in the refrigerator for 10 minutes to set.
Prepare the Chocolate Layer
- In a microwave-safe bowl, combine the chocolate chips and heavy cream.
- Microwave in 20-second intervals, stirring after each interval, until the chocolate is melted and the mixture is smooth.
- Pour this chocolate mixture over the chilled crust, spreading it evenly with a spatula.
- Place the pan back in the fridge for 15-20 minutes until the chocolate firms up.
Make the Cheesecake Filling
- In a large mixing bowl, beat the softened cream cheese, powdered sugar, and vanilla extract until smooth and creamy.
- Gently fold in the whipped cream to give the filling a light, airy texture.
Assemble the Layers
- Spoon the cheesecake filling over the chocolate layer, smoothing it out with a spatula.
- Pour the caramel sauce over the cheesecake filling, gently spreading it to cover the surface evenly.
Final Chocolate Drizzle
- (Optional) Melt additional chocolate chips with a splash of heavy cream in the microwave, stirring until smooth.
- Drizzle the melted chocolate over the caramel layer, allowing it to drip down the sides for a decorative finish.
Chill and Serve
- Refrigerate the cheesecake for at least 4 hours, or until fully set.
- For easy slicing, warm your knife with hot water, wipe it clean, and then cut into slices. Enjoy the delicious layers of chocolate, caramel, and creamy cheesecake!
Kitchen Equipment Needed
- Springform pan (8- or 9-inch)
- Mixing bowls for crust, filling, and chocolate layers
- Spatula for spreading layers
- Electric mixer for cheesecake filling
- Microwave-safe bowl for melting chocolate
Serving and Storage Tips
- Serving: Serve chilled for the best texture. It’s especially delicious with an extra drizzle of caramel or chocolate sauce.
- Storage: Store any leftovers in the refrigerator for up to 5 days, covered tightly.
- Freezing: This cheesecake freezes well! Wrap individual slices in plastic wrap and store in an airtight container for up to 2 months. Thaw in the refrigerator before serving.
Variations
- Salted Caramel: Sprinkle a little sea salt over the caramel layer for a sweet-salty twist.
- Add Twix Pieces: Fold chopped Twix bars into the cheesecake filling for extra texture and flavor.
- Oreo Crust: Swap the graham cracker crust for crushed Oreos for a chocolatey base.
- Peanut Butter Drizzle: Melt a bit of peanut butter and drizzle over the top for a Reese’s-inspired flavor.
Helpful Tips
- Softened Cream Cheese: Use room temperature cream cheese to avoid lumps in the filling.
- Press Crust Firmly: Press the crust mixture firmly into the pan to ensure it holds together.
- Chill for Clean Slices: Chilling the cheesecake thoroughly makes it easier to slice without disrupting the layers.
Frequently Asked Questions
1. Can I use store-bought caramel sauce?
Yes! Store-bought caramel sauce works perfectly in this recipe, saving time and adding rich flavor.
2. How do I prevent the crust from crumbling?
Make sure the crust mixture is well-combined, and press it firmly into the pan. Chilling it for a few minutes before adding layers also helps it set.
3. Can I make this recipe ahead of time?
Absolutely! This cheesecake can be made a day or two in advance and stored in the fridge until you’re ready to serve.
4. Can I use milk chocolate instead of semi-sweet chocolate?
Yes, but the cheesecake will be sweeter. Adjust the sweetness by slightly reducing the powdered sugar in the filling if desired.
5. How can I make this gluten-free?
Use gluten-free graham crackers for the crust to make this recipe gluten-free.
This no-bake Twix cheesecake is the ultimate crowd-pleaser with its indulgent layers of chocolate, caramel, and creamy filling. Perfect for any gathering, it’s an easy, no-fuss recipe that will have everyone asking for seconds (and the recipe)!
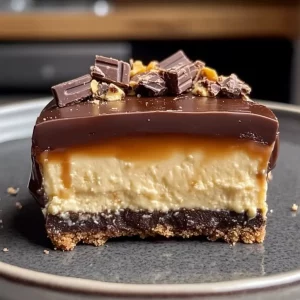
Homemade No-Bake Twix Cheesecake Recipe
Ingredients
- 2 cups graham cracker crumbs
- 1/2 cup melted butter
- 1 cup chocolate chips
- 1/2 cup heavy cream
- 2 cups cream cheese softened
- 1/2 cup powdered sugar
- 1 tsp vanilla extract
- 1 cup caramel sauce
- 1 cup whipped cream
Instructions
- 2 cups graham cracker crumbs
- 1/2 cup melted butter
- 1 cup chocolate chips
- 1/2 cup heavy cream
- 2 cups cream cheese, softened
- 1/2 cup powdered sugar
- 1 teaspoon vanilla extract
- 1 cup caramel sauce
- 1 cup whipped cream
Notes
- Softened Cream Cheese: Use room temperature cream cheese to avoid lumps in the filling.
- Press Crust Firmly: Press the crust mixture firmly into the pan to ensure it holds together.
- Chill for Clean Slices: Chilling the cheesecake thoroughly makes it easier to slice without disrupting the layers.

