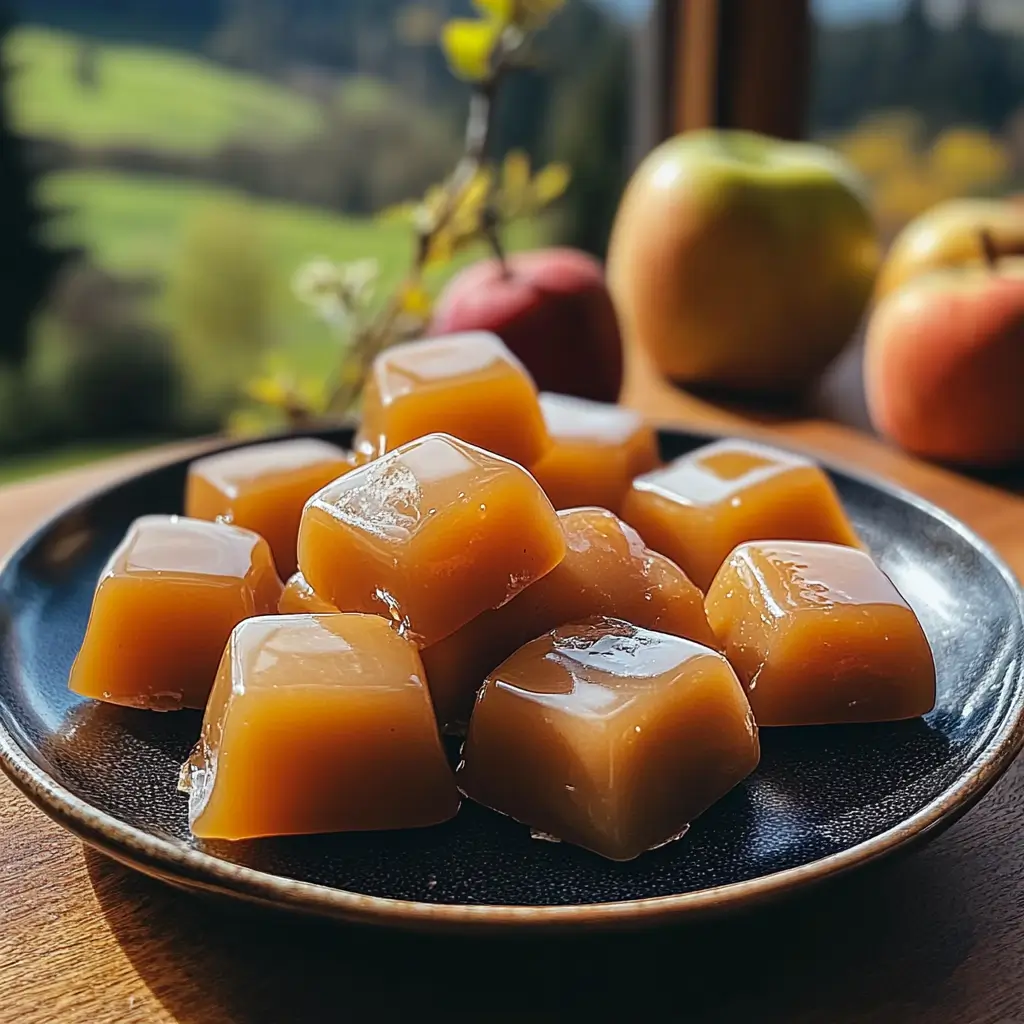
These Apple Cider Caramels capture the cozy essence of autumn with every chewy, spiced bite. Reduced apple cider and warming spices add a depth of flavor that elevates these homemade caramels to a whole new level. Perfect for gifting or as a seasonal treat to savor, these caramels make a great addition to your fall dessert repertoire.
Why You’ll Love This Recipe
- Intense Fall Flavor: The reduced apple cider brings out a rich, apple-forward flavor complemented by warm spices.
- Perfect Texture: Soft and chewy, these caramels have just the right consistency without being sticky.
- Great for Gifting: Wrapped individually, these caramels make a lovely homemade gift or party favor.
Ingredients
- 8 cups apple cider – for reduction
- 3 1/2 cups heavy whipping cream
- 1/2 cup butter (plus extra for greasing)
- 4 1/4 cups granulated sugar
- 3/4 cup light corn syrup
- 1/4 cup water
- 1 teaspoon salt
- 1 teaspoon vanilla extract
- 1/2 teaspoon ground cinnamon
- 1 pinch ground allspice (about 1/8 teaspoon)
- 1 pinch ground ginger (about 1/8 teaspoon)
- 1 pinch ground nutmeg (about 1/8 teaspoon)
Step-by-Step Instructions
Step 1: Prepare the Pan
- Butter a 9″x13″ baking pan and line it with parchment paper, leaving an overhang on the sides to help lift the caramel out later. Butter the parchment paper as well and set aside.
Step 2: Reduce the Apple Cider
- In a medium saucepan, bring the apple cider to a simmer over medium heat. Let it cook, reducing down to about 1 cup (this can take 30-60 minutes). As it reduces, it will become thick and syrupy. Keep an eye on it during the last 15 minutes to prevent burning.
Step 3: Prepare the Cream Mixture
- In another saucepan, combine the heavy cream and butter. Warm the mixture over medium heat until the butter melts and the mixture just starts to simmer. Set aside and keep warm.
Step 4: Start the Caramel Base
- In a large, heavy-bottomed pot, combine the granulated sugar, reduced apple cider, corn syrup, water, and salt. Attach a candy thermometer to the side of the pot. Heat the mixture over medium-high heat, stirring only as needed to dissolve any sugar crystals on the sides of the pot. Bring the mixture to a simmer until it begins to caramelize.
Step 5: Combine Mixtures
- Carefully pour the warmed cream mixture into the caramel base, stirring continuously as you add it. Continue cooking over medium heat, stirring occasionally, until the caramel reaches 250°F (120°C) on the candy thermometer.
Step 6: Add Spices
- Once the mixture reaches 250°F, remove it from the heat and stir in the vanilla extract, ground cinnamon, allspice, ginger, and nutmeg until fully incorporated.
Step 7: Pour and Set
- Carefully pour the hot caramel into the prepared pan. Use a spatula to spread it evenly if needed. Allow the caramel to cool at room temperature for about an hour, then cover and refrigerate until completely set and cold.
Step 8: Cut and Wrap
- Once the caramel is fully set, lift it out of the pan using the parchment overhang. Cut into 1-inch strips, then slice each strip into bite-sized pieces. Wrap each piece in wax or parchment paper for storage.
Kitchen Equipment Needed
- Large pot for the caramel base
- Medium saucepan for reducing the cider and warming the cream mixture
- Candy thermometer to monitor the caramel temperature
- 9×13-inch baking pan lined with parchment paper
- Sharp knife for slicing the caramel
Serving and Storage Tips
- Serving Suggestions: These caramels are perfect for dessert platters, holiday gifts, or just a cozy autumn treat.
- Storage: Wrap each piece in wax or parchment paper to prevent sticking. Store in an airtight container at room temperature for up to 2 weeks.
- Freezing Option: Caramels freeze well! Store wrapped caramels in a freezer-safe bag for up to 3 months.
Variations
- Extra Spiced: Increase the ground cinnamon, allspice, and nutmeg slightly if you prefer a more pronounced spice flavor.
- Add Nuts: Fold in finely chopped toasted pecans or walnuts just before pouring the caramel into the pan for added crunch.
- Salted Caramel: For a salted caramel twist, sprinkle a bit of flaky sea salt on top before cooling.
Helpful Tips
- Stirring Carefully: Once you’ve combined the sugar and corn syrup, avoid stirring too much to prevent crystallization.
- Reduce Cider Slowly: Reducing the cider intensifies the flavor, so don’t rush this step. The cider should become thick and syrupy.
- Be Precise with Temperature: Using a candy thermometer ensures you reach the right consistency for chewy caramels without undercooking or overcooking.
Frequently Asked Questions
1. Can I use apple juice instead of apple cider?
Apple cider has a more intense apple flavor compared to juice, but you can substitute if needed. Just make sure to reduce it down to concentrate the flavor.
2. How do I prevent the caramel from becoming too hard?
Make sure to cook the caramel to exactly 250°F. Any higher, and the caramel may harden more than desired.
3. Can I skip the spices?
Yes! While the spices enhance the fall flavor, you can omit them for a plain apple caramel.
4. Can I use dark corn syrup?
Light corn syrup is ideal for this recipe as it has a milder flavor, which complements the apple and spices.
5. How do I prevent the caramels from sticking together?
Wrap each piece individually in wax or parchment paper to keep them from sticking.
These Apple Cider Caramels capture the spirit of autumn with their spiced, apple-infused flavor. They’re perfect for gifting or treating yourself to a sweet taste of fall!

Apple Cider Caramels: Chewy, Spiced Caramels Perfect for Fall
Ingredients
- 8 cups apple cider
- 3 1/2 cups heavy whipping cream
- 1/2 cup butter plus extra for greasing
- 4 1/4 cups granulated sugar
- 3/4 cup light corn syrup
- 1/4 cup water
- 1 teaspoon salt
- 1 teaspoon vanilla extract
- 1/2 teaspoon ground cinnamon
- 1 pinch ground allspice about 1/8 teaspoon
- 1 pinch ground ginger about 1/8 teaspoon
- 1 pinch ground nutmeg about 1/8 teaspoon
Instructions
- Prepare the Pan: Butter a 9″x13″ pan and line with parchment paper, leaving an overhang on the sides for easy removal. Butter the parchment and set the pan aside.
- Reduce the Apple Cider: In a medium saucepan over medium heat, simmer the apple cider until it reduces to about 1 cup, which will take 30 minutes to 1 hour. Keep a close eye on it during the last 15 minutes to prevent burning. The cider should become thick and syrupy when ready.
- Prepare the Cream Mixture: In another pot, combine the heavy cream and 1/2 cup of butter. Heat over medium heat until the butter melts and the mixture begins to simmer.
- Make the Caramel Base: In a large, heavy-bottomed pot, add the sugar, reduced apple cider, corn syrup, water, and salt. Attach a candy thermometer to the side of the pot. Without stirring, bring the mixture to a simmer over medium-high heat until the sugar dissolves and starts to caramelize. Stir gently only as needed to dissolve any crystals on the sides.
- Combine Mixtures: Slowly add the heated cream mixture to the caramel base, stirring continuously. Continue cooking over medium heat, stirring occasionally, until the caramel reaches 250°F.
- Add Spices: Once the mixture reaches temperature, stir in the vanilla extract, cinnamon, allspice, ginger, and nutmeg.
- Pour and Set: Carefully pour the caramel into the prepared pan, spreading it evenly with a spatula if necessary.
- Cool and Slice: Allow the caramel to cool to room temperature, then cover and refrigerate until completely set and cold.
- Cut and Wrap: Once firm, lift the caramel out of the pan using the parchment overhang. Slice the caramel into 1-inch wide strips, then cut each strip into bite-sized pieces. Wrap each caramel in wax or parchment paper.
Notes
- Storage: Keep caramels wrapped in wax paper or parchment and store in an airtight container. They stay fresh for up to two weeks.
- For a Deeper Flavor: Use dark brown sugar in place of granulated sugar for a richer, more molasses-like taste.


