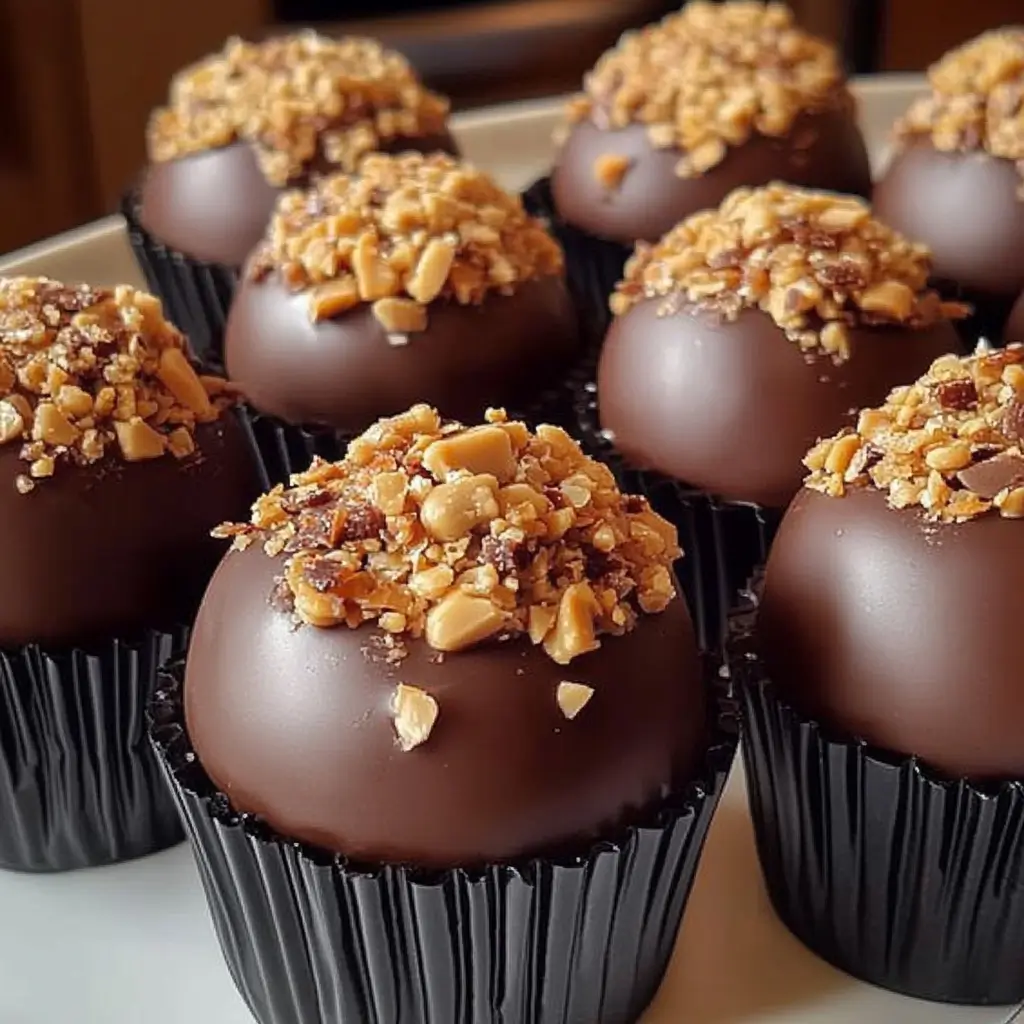
If you’re a fan of peanut butter and chocolate, these Butterfinger Peanut Butter Bombs will hit all the right notes. These bite-sized delights combine the creamy richness of peanut butter with the irresistible crunch of Butterfinger candy, all encased in a smooth chocolate shell. Perfect for parties, gifts, or just treating yourself, they’re an easy no-bake dessert that requires minimal effort but delivers maximum flavor.
Why You’ll Love This Recipe
- No Oven Needed: Ideal for warm days when you don’t want to turn on the oven.
- Quick and Easy: With just 20 minutes of prep, these sweet treats are ready in under an hour.
- Decadent Flavors: Creamy peanut butter, crunchy Butterfinger bits, and rich chocolate create an indulgent trifecta.
- Make-Ahead Friendly: Prepare in advance for parties or store them for a quick snack anytime.
- Perfect for Gifting: These little bombs are beautifully presentable and make a thoughtful homemade gift.
Ingredients You’ll Need
- 1 cup creamy peanut butter: The base for that rich and smooth texture.
- 1/2 cup unsalted butter, softened: Adds creaminess and helps bind the mixture.
- 1 cup powdered sugar: Sweetens the mix and provides structure.
- 1 cup graham cracker crumbs: Adds a slightly crunchy texture and depth of flavor.
- 1 cup Butterfinger candy bars, crushed: For that signature candy crunch and flavor.
- 2 cups milk chocolate chips: The perfect coating for a silky, chocolatey finish.
- 1 tablespoon coconut oil (optional): Helps the chocolate melt smoothly for easy dipping.
Step-by-Step Directions
Step 1: Blend the Base
In a large mixing bowl, combine the creamy peanut butter and softened butter. Mix until completely smooth and well-blended.
Step 2: Incorporate Dry Ingredients
Gradually sift in the powdered sugar and graham cracker crumbs, stirring until the mixture is uniform in texture.
Step 3: Add the Butterfinger Crunch
Gently fold in the crushed Butterfinger candy bars, ensuring the candy is evenly distributed throughout the mixture.
Step 4: Shape the Bombs
Using your hands or a cookie scoop, roll the mixture into small balls (approximately 1 inch in diameter). Place the formed balls on a parchment-lined baking sheet.
Step 5: Chill the Bombs
Refrigerate the peanut butter bombs for about 30 minutes to firm them up for easier dipping.
Step 6: Melt the Chocolate
In a microwave-safe bowl, melt the milk chocolate chips in 30-second intervals, stirring after each burst until fully melted and smooth. If desired, mix in 1 tablespoon of coconut oil to create a glossy finish.
Step 7: Dip and Coat
Remove the chilled balls from the refrigerator. Dip each peanut butter bomb into the melted chocolate, ensuring they are completely coated. Place the coated bombs back onto the parchment-lined sheet.
Step 8: Set the Coating
Let the chocolate coating set at room temperature, or refrigerate the bombs for 15-20 minutes to speed up the process.
Step 9: Serve and Enjoy
Once the chocolate is firm, your Butterfinger Peanut Butter Bombs are ready to enjoy!
Kitchen Equipment Needed
- Large mixing bowl
- Microwave-safe bowl
- Parchment-lined baking sheet
- Spoon or spatula
- Cookie scoop or your hands for shaping
Serving and Storage Tips
Serving Suggestions
- Snack Time: Enjoy as a sweet treat with a cup of coffee or tea.
- Party Tray: Arrange on a decorative plate for gatherings or events.
- Gift Idea: Package in a decorative tin or box for a thoughtful homemade gift.
Storage
- Refrigerator: Store the bombs in an airtight container for up to 2 weeks.
- Freezer: Freeze for up to 3 months. Thaw at room temperature before serving.
Variations
- Dark Chocolate Lovers: Swap milk chocolate chips for dark chocolate for a richer flavor.
- Crunchy Peanut Butter: Use crunchy peanut butter for an extra texture boost.
- Nut-Free Option: Replace peanut butter with a nut-free alternative like sunflower seed butter.
- Candy Variations: Experiment with different crushed candies like Snickers or Reese’s Pieces.
- Holiday Twist: Add festive sprinkles or colored candy melts to match seasonal celebrations.
Helpful Notes
- For a smooth dipping experience, keep the chocolate warm by placing the bowl over a pot of simmering water.
- Crush the Butterfinger bars finely for even distribution, but leave a few larger chunks for added texture.
- If the mixture feels too sticky when shaping, lightly grease your hands or the cookie scoop with non-stick spray.
Tips from Well-Known Chefs
- Chef Ina Garten: “Using high-quality chocolate elevates no-bake desserts—choose the best you can find.”
- Chef Duff Goldman: “When melting chocolate, always stir frequently to prevent scorching and ensure a silky texture.”
- Chef Giada De Laurentiis: “Adding a hint of sea salt to the chocolate coating enhances the flavor profile and balances the sweetness.”
Frequently Asked Questions
1. Can I make these dairy-free?
Yes, use dairy-free butter, peanut butter, and chocolate chips to make this recipe completely dairy-free.
2. How can I crush the Butterfinger bars easily?
Place the candy bars in a sealed plastic bag and crush them with a rolling pin or use a food processor for finer crumbs.
3. What can I use instead of graham cracker crumbs?
You can substitute with finely crushed digestive biscuits, vanilla wafers, or even Oreo crumbs for a unique twist.
4. How do I prevent the chocolate from cracking?
Ensure the peanut butter bombs are not too cold before dipping, as extreme temperature differences can cause the chocolate to crack.
5. Can I double the recipe?
Absolutely! Just make sure you have enough space to chill and coat the extra batches.
These Butterfinger Peanut Butter Bombs are a no-bake masterpiece that’s as fun to make as it is to eat. With their rich flavors and satisfying textures, they’re guaranteed to delight your sweet tooth and impress anyone lucky enough to try them. Give them a go—you won’t regret it!

