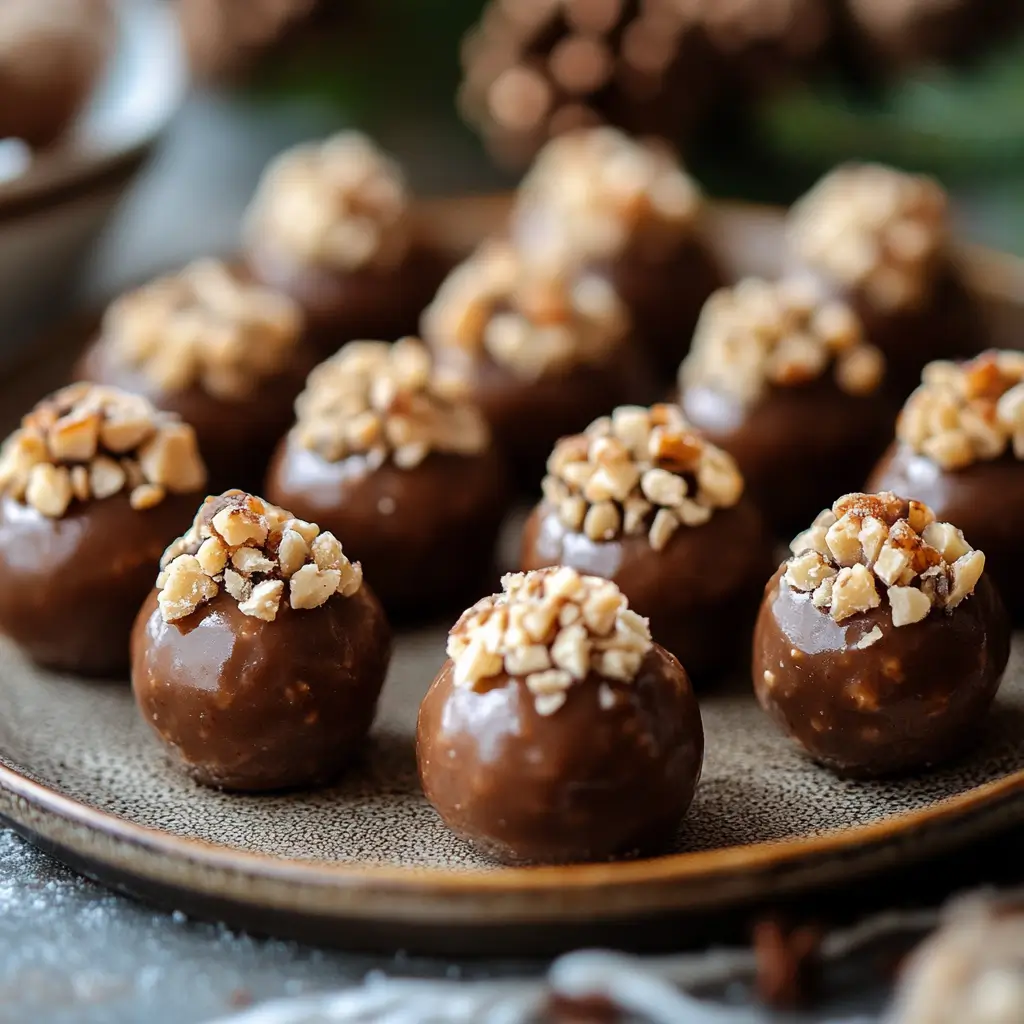
Maple Balls are a delightful holiday treat that brings together the rich, sweet flavor of maple with the creamy texture of a classic buckeye candy. Imagine a bite-sized, smooth maple-flavored filling, coated in decadent chocolate and topped with a crunchy walnut—what could be more festive? These little indulgences are perfect for holiday gift-giving, cookie exchanges, or simply enjoying during cozy winter nights. If you love maple syrup and creamy confections, these candies will surely become a holiday tradition in your home.
Why You Will Love This Recipe:
Maple Balls are the perfect combination of flavors and textures. The maple-flavored filling is soft and melt-in-your-mouth delicious, while the chocolate coating adds a rich, smooth contrast. The walnut topping gives each bite a delightful crunch, making these candies impossible to resist. They are also incredibly easy to make, with only a few simple ingredients that come together quickly. Whether you’re a maple fan or a chocolate lover, these treats are sure to be a hit at your next holiday gathering.
Ingredients:
- 7 oz. sweetened condensed milk (half of a can)
- ¼ cup softened butter
- 1 teaspoon vanilla extract
- 2 ½ teaspoons maple extract
- 2 tablespoons maple syrup
- ¼ teaspoon salt
- 3 ½ cups powdered sugar (plus more if needed)
- ¾ cup chopped walnuts (plus a few extra for topping)
- 2 cups chocolate chips
Kitchen Equipment Needed:
- Mixer (hand-held or stand mixer)
- Measuring cups and spoons
- Large mixing bowl
- Baking sheet
- Parchment paper
- Fork or dipping tool
- Microwave-safe bowl (or double boiler for melting chocolate)
Instructions:
Step 1: Prepare the Maple Filling In a large mixing bowl, beat together the sweetened condensed milk, softened butter, vanilla extract, maple extract, maple syrup, and salt. You can use a hand mixer or stand mixer to make this process easier. Mix until all ingredients are well incorporated, creating a smooth, creamy base for the maple filling.
Step 2: Add the Powdered Sugar Add the powdered sugar ½ cup at a time, mixing well after each addition. The mixture will gradually thicken as you add the sugar, turning into a dough-like consistency. You may need a little more or less than 3 ½ cups of powdered sugar, depending on the humidity and your specific ingredients. Aim for a dough that is thick but not overly sticky.
Step 3: Incorporate the Walnuts Once the dough has come together, add ½ cup of chopped walnuts. Stir until the walnuts are evenly distributed throughout the dough. If the dough is still a little sticky, you can chill it in the refrigerator for about 15-20 minutes to firm up and make it easier to handle.
Step 4: Roll the Dough into Balls Scoop out small portions of dough and roll them into balls, about 1 inch in diameter. Place each ball onto a baking sheet lined with parchment paper. This will prevent the balls from sticking and make it easier to transfer them once they’re coated in chocolate. Once all the balls are rolled, refrigerate or freeze them for at least an hour, or until they are firm enough to dip in chocolate.
Step 5: Melt the Chocolate While the maple balls are chilling, melt the chocolate chips in the microwave or using a double boiler. If using the microwave, heat the chocolate in a microwave-safe bowl at 50% power in 40-second intervals, stirring each time until smooth and fully melted. Alternatively, melt the chocolate in a double boiler on the stovetop, stirring until smooth.
Step 6: Coat the Maple Balls in Chocolate Once the chocolate is melted and smooth, it’s time to dip the maple balls. Using a fork, carefully dip each maple ball into the chocolate, making sure it is completely covered. Tap the fork on the edge of the bowl to let any excess chocolate drip off.
Step 7: Add the Walnut Topping After dipping the balls in chocolate, place them back onto the parchment-lined baking sheet. While the chocolate is still soft, top each ball with a small piece of the remaining chopped walnuts for a crunchy, decorative touch.
Step 8: Let the Chocolate Harden Allow the chocolate to harden completely before touching the maple balls. You can speed up the process by placing them in the refrigerator for about 15 minutes or until the chocolate is fully set.
Step 9: Serve and Enjoy Once the chocolate has hardened, your Maple Balls are ready to be served! They are perfect for holiday parties, gift boxes, or as a sweet treat to enjoy with family and friends. Keep them stored in an airtight container at room temperature or refrigerate them for longer shelf life.
Serving and Storage Tips:
- Serving: These Maple Balls are the perfect bite-sized treat for any holiday gathering. Serve them on a festive platter or package them in small gift boxes for a homemade holiday gift. They’re also great for cookie exchanges or as a special treat to bring to a party.
- Storage: Store the Maple Balls in an airtight container at room temperature for up to one week. If you want to keep them fresh for longer, store them in the refrigerator, where they’ll stay good for up to two weeks. You can also freeze them for up to 3 months.
Variations:
- Nuts: If you’re not a fan of walnuts, feel free to substitute with other nuts like pecans, hazelnuts, or almonds. Just be sure to chop them finely before adding them to the dough.
- Maple Flavor: If you prefer a stronger maple flavor, you can increase the amount of maple extract to taste. Start with an additional ½ teaspoon and adjust from there.
- Chocolate Coating: While milk chocolate is the most common choice, you can also use dark chocolate or white chocolate for a different flavor profile. The slight bitterness of dark chocolate pairs beautifully with the sweetness of the maple filling.
Helpful Notes:
- Chill the Dough: If your dough is too sticky to roll into balls, chilling it for about 15-20 minutes will help firm it up and make it easier to handle.
- Melt Chocolate Gently: Be careful not to overheat the chocolate when melting it. If you use the microwave, always melt it at half power and stir every 40 seconds to avoid burning.
- Dipping Tip: To avoid getting your fingers messy, use a fork or a special dipping tool to dip each maple ball into the melted chocolate.
Tips from Well-Known Chefs:
- Ina Garten: “When making chocolate-dipped candies, I always use a fork to dip them. It makes it easy to coat the candy evenly without making a mess.”
- Martha Stewart: “Be sure to chill your candies thoroughly before dipping them. This helps prevent the chocolate from melting and gives your treats a beautiful, smooth coating.”
Frequently Asked Questions:
1. Can I use regular butter instead of salted butter? Yes, you can use unsalted butter if you prefer. Just add a pinch of salt to the mixture to balance out the sweetness.
2. Can I freeze the Maple Balls? Yes, Maple Balls freeze well! Store them in an airtight container and freeze them for up to 3 months. Let them thaw at room temperature before serving.
3. Can I use different types of chocolate for dipping? Absolutely! You can use dark chocolate, milk chocolate, or white chocolate depending on your preference. Each will add a unique flavor to the candy.
4. What if my dough is too sticky to roll into balls? If the dough is sticky, chill it in the refrigerator for 15-20 minutes to firm it up. You can also add a little more powdered sugar if needed to help it hold its shape.
5. How long do Maple Balls last? Maple Balls will last about 1 week at room temperature when stored in an airtight container. They can also be refrigerated for up to 2 weeks for a longer shelf life.
These Maple Balls are a perfect combination of maple sweetness, creamy filling, and chocolate indulgence. With their easy preparation, rich flavor, and festive appearance, they make the ideal holiday treat. Whether you’re gifting them to friends or enjoying them yourself, these delicious candies are sure to become a favorite!


