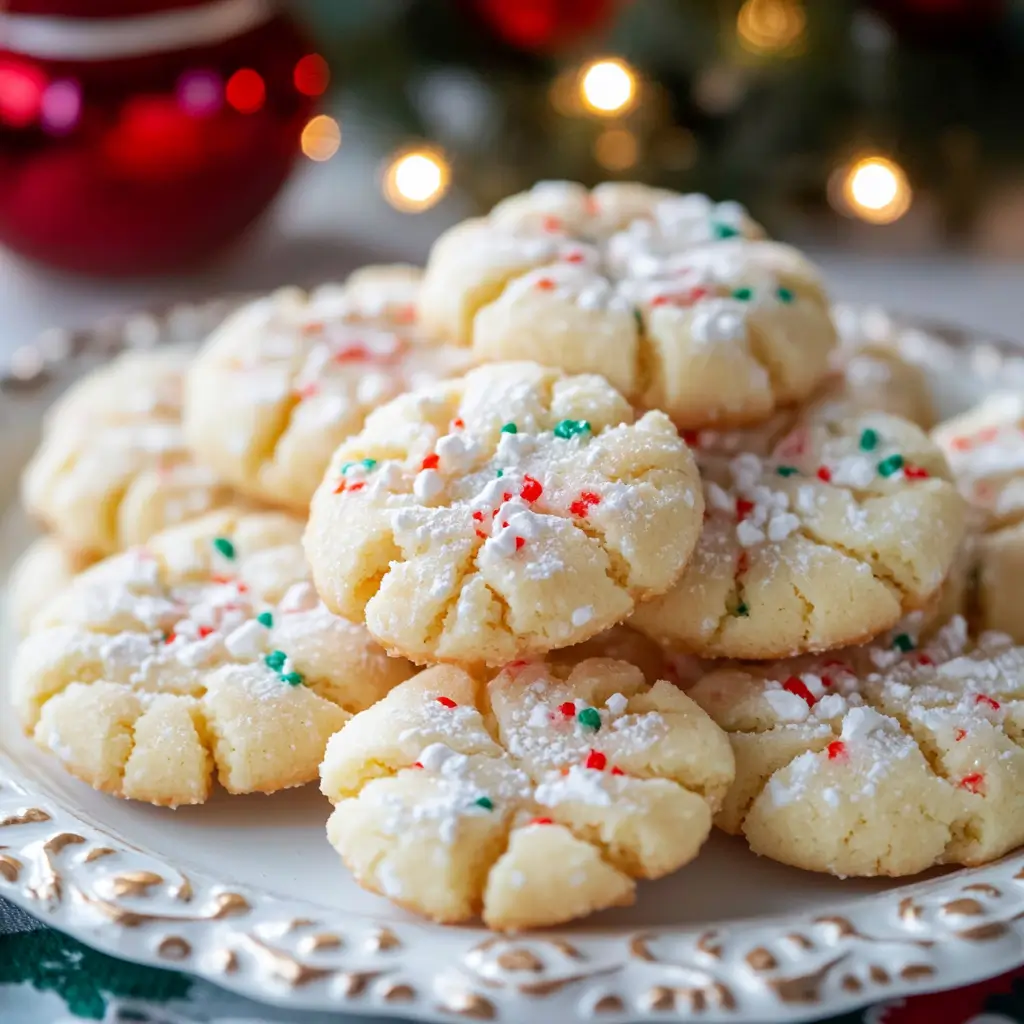
The holidays are the perfect time to bake up something that’s both delicious and visually festive. These Christmas Ooey Gooey Butter Cookies are a true crowd-pleaser, with their soft, melt-in-your-mouth texture, bright sprinkles, and sweet, buttery flavor. They’re easy to make and filled with the holiday cheer you crave. With just a few ingredients and minimal prep, you can have these cookies baking in the oven and filling your kitchen with that warm, comforting aroma that makes Christmas so special. Whether you’re baking for a holiday party, gift-giving, or just because, these cookies will definitely put you in the holiday spirit.
Why You Will Love This Recipe:
These Christmas Ooey Gooey Butter Cookies are the ultimate festive treat. They’re gooey, buttery, and topped with colorful Christmas sprinkles that make them extra cheerful. The texture is soft and pillowy, and the sweetness is perfectly balanced, making them hard to resist. The best part? They’re so simple to make! With minimal effort and a few basic ingredients, you’ll have 24 gorgeous, melt-in-your-mouth cookies ready to share and enjoy. This recipe is perfect for cookie exchanges, holiday parties, or simply indulging in a sweet treat at home.
Ingredients:
- ½ cup (1 stick / 113 g) salted butter, softened
- 1 package (8 ounces) cream cheese, softened
- 1 ½ cups (300 g) granulated sugar
- 1 large egg, room temperature
- 1 teaspoon vanilla extract
- 2 ¼ cups (282 g) all-purpose flour
- 1 cup (126g) confectioners’ sugar, divided
- 3 teaspoons baking powder
- ⅓ cup Christmas sprinkles (or any colorful sprinkles of your choice)
Kitchen Equipment Needed:
- Hand-held mixer (or stand mixer)
- Large mixing bowl
- Cookie scoop or tablespoon
- Parchment paper
- Baking sheets
- Wire rack for cooling
Instructions:
Step 1: Preheat the Oven and Prepare the Baking Sheets Start by preheating your oven to 350°F (175°C). Line your baking sheets with parchment paper to ensure that the cookies don’t stick and come out perfectly golden. This will also help with easy cleanup afterward.
Step 2: Cream Together Butter, Cream Cheese, and Sugar In a large mixing bowl, use a hand-held mixer to beat together softened butter, cream cheese, and granulated sugar until they are well blended and smooth. This will create the base of your cookie dough, giving the cookies their signature soft and gooey texture.
Step 3: Add the Egg and Vanilla Once the butter, cream cheese, and sugar are mixed together, add in 1 large egg and 1 teaspoon vanilla extract. Beat on medium speed until fully combined. The egg will help bind the ingredients together, while the vanilla adds a lovely, fragrant flavor that complements the sweetness of the dough.
Step 4: Mix in the Dry Ingredients In a separate bowl, whisk together the all-purpose flour, baking powder, and ½ cup of the confectioners’ sugar. With your mixer set to low, gradually add the dry ingredients into the wet ingredients, mixing until just incorporated. The dough should be thick but still soft and sticky.
Step 5: Fold in the Sprinkles Gently fold in the Christmas sprinkles with a spatula or spoon until evenly distributed. This will give your cookies a pop of festive color and make them extra fun! Be careful not to overmix; you just want the sprinkles to be scattered throughout the dough.
Step 6: Scoop and Roll the Dough Using a 2-tablespoon cookie scoop, portion out the dough. Roll each dough ball in the remaining ½ cup of confectioners’ sugar to coat it well. This will give the cookies their signature sugary coating and contribute to their slightly crackled appearance once baked.
Step 7: Flatten the Dough Balls Place about 6 dough balls on each of your prepared baking sheets, leaving enough space between them to allow for spreading. Use the bottom of a glass or your hand to gently flatten each dough ball, creating a disc shape. Don’t flatten them too much—just enough to help them bake evenly.
Step 8: Bake the Cookies Bake the cookies in your preheated oven for 8-11 minutes, or until the tops of the cookies no longer look wet, and the edges are lightly golden. Be careful not to overbake them; these cookies should remain soft and gooey in the center, which is part of their charm.
Step 9: Cool and Serve Allow the cookies to rest on the baking sheet for about 5 minutes to firm up slightly. Then, transfer them to a wire rack to cool completely. This resting period helps the cookies maintain their soft, gooey texture while cooling down.
Once cooled, enjoy your Ooey Gooey Butter Cookies with a glass of milk or a hot cup of cocoa. They’ll be a hit with everyone who tries them!
Serving and Storage Tips:
- Serving: These cookies are perfect for any holiday gathering, cookie exchange, or simply as a treat to enjoy with family and friends. Serve them on a festive plate or in a holiday-themed gift box for an extra touch of Christmas cheer.
- Storage: Store these cookies in an airtight container at room temperature for up to 1 week. To keep them fresh for longer, you can refrigerate them. Just allow the cookies to come to room temperature before serving for the best texture.
Variations:
- Different Sprinkles: While Christmas sprinkles add a festive touch, feel free to use any sprinkles or edible decorations you prefer. Red, green, or rainbow sprinkles are perfect for year-round use.
- Add-Ins: You can mix in chocolate chips, crushed candy canes, or chopped nuts for extra texture and flavor. Make sure to fold these in gently to avoid overmixing.
- Lemon Twist: For a fresh twist, replace the vanilla extract with 1 teaspoon lemon extract. This gives the cookies a light citrusy flavor that pairs beautifully with the creamy butter.
Helpful Notes:
- Soft Butter and Cream Cheese: Make sure the butter and cream cheese are softened to room temperature before mixing. This ensures that they blend smoothly and create a creamy dough that will bake into soft cookies.
- Don’t Overmix the Dough: Overmixing can make the dough tough. Mix until just combined to maintain the cookies’ delicate texture.
- Flatten the Dough Slightly: These cookies don’t spread much while baking, so it’s important to flatten them before baking to achieve a nice, even shape.
Tips from Well-Known Chefs:
- Martha Stewart: “When making butter cookies, make sure to coat the dough in powdered sugar. It creates a lovely crackled texture and keeps the cookies soft and chewy.”
- Joy Wilson (Joy the Baker): “I always use room-temperature butter and cream cheese to get a smooth, creamy dough. It makes a huge difference in the texture and consistency of the cookies.”
Frequently Asked Questions:
1. Can I make these cookies ahead of time? Yes, these cookies can be made ahead of time. You can store them in an airtight container at room temperature for up to a week. Alternatively, freeze the dough for up to 3 months, then bake the cookies fresh when you’re ready to serve them.
2. Can I use unsalted butter instead of salted butter? Yes, you can use unsalted butter. Just add a pinch of salt to the dough to balance the sweetness.
3. Why did my cookies spread too much? If your cookies spread too much, it could be because the dough was too soft. Ensure that the dough is chilled for about 30 minutes before baking to help it hold its shape better.
4. Can I use a stand mixer instead of a hand-held mixer? Absolutely! A stand mixer will work perfectly for this recipe. Just make sure to use the paddle attachment and mix at low speed to avoid overmixing the dough.
5. Can I freeze the cookies? Yes, you can freeze these cookies! Place the cookies in a single layer on a baking sheet and freeze them for 1-2 hours. Then, transfer them to an airtight container or freezer bag and store for up to 3 months.
These Christmas Ooey Gooey Butter Cookies are the perfect treat to make your holiday season a little sweeter and a lot more festive. Whether you’re baking for a crowd or just indulging in a cozy treat at home, these cookies are sure to be a hit.

